
![]()
![]() SLAM4 -
Réalisation et maintenance de composants logiciels
SLAM4 -
Réalisation et maintenance de composants logiciels
TP Java-Android : développement d'une calculatrice
1- Présentation de l'application à développer
2- Création du projet sous Eclipse
3- Première exécution
4- Création des fichiers ressources
5- Création de l'interface graphique
6- Programmation Java
7- Améliorations à réaliser
Ce TP est une adaptation personnelle du tutoriel Android n°6 du site www.tutomobile.fr !
1- Présentation de l'application à développer
Cette application consiste en une petite calculatrice proposant les 4 opérations arithmétiques de base :


2- Création du projet sous Android
Créez le projet, le nommer Android_Calculatrice, choisir la version du SDK souhaitée.
Tester immédiatement l'application sur un émulateur, sur votre téléphone ou une tablette.
3- Création des fichiers ressources
3-1 Modification du fichier res/values/strings.xml
Le répertoire res/values contient un fichier strings.xml contenant différentes chaines utilisées par l'application (il contient initialement 2 chaines hello et app_name) ; double-cliquez sur ce fichier. En mode "text" supprimer la chaine hello pour obtenir :
<resources>
<string
name="app_name">Calculatrice_Android</string>
<string
name="action_settings">Settings</string>
</resources>
Vous pouvez cliquer sur open Editor… pour obtenir l'écran suivant :

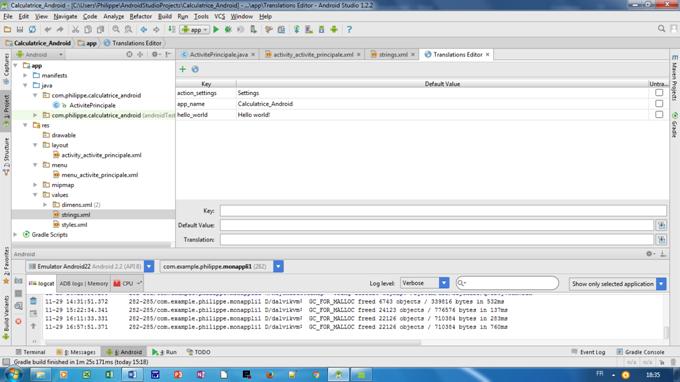
Sélectionnez la chaine app_name et modifiez sa valeur (value) en "Calculatrice".
Sauvegardez le fichier.
5- Création de l'interface graphique
Un layout correspond à une disposition d'objets graphiques.
Le fichier res/layout/nomDeLactivité.xml contient la description de l'interface graphique.
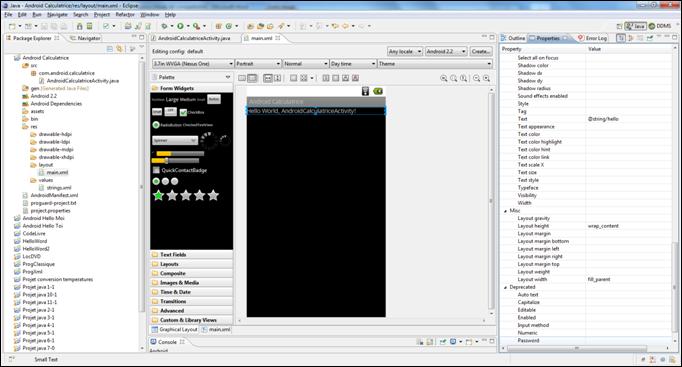
Faites un double-clic sur ce fichier pour l'ouvrir en mode graphique.
En sélectionnant un objet de l'interface, on peut vérifier ou régler ses propriétés dans l'onglet Properties situé à droite.
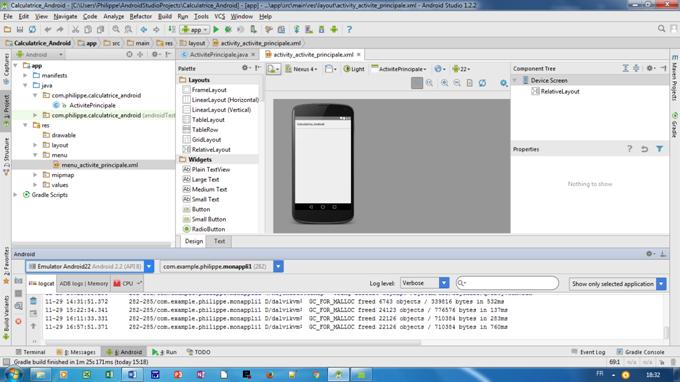
Dès la création d'un nouveau projet, l'interface comporte un objet RelativeLayout et un objet TextView :


On pourrait aussi modifier directement le fichier XML en cliquant sur l'onglet text, mais cette méthode est plus laborieuse :
<?xml version="1.0" encoding="utf-8"?>
<LinearLayout xmlns:android="http://schemas.android.com/apk/res/android"
android:layout_width="fill_parent"
android:layout_height="fill_parent"
android:orientation="vertical" >
<TextView
android:layout_width="match_parent"
android:layout_height="wrap_content"
android:text="@string/hello" />
</LinearLayout>
Restez dans l'Android layout editor, sélectionnez l'objet TextView, et supprimez-le.
Dans la palette, ouvrez le groupe TextFields, choisissez l'objet Plain Text (le premier de la liste) et placez le en haut du layout principal. Puis réglez ses propriétés :
· Id = @+id/editTextAffichage clic droit sur l'objet et choisir Edit ID... ou Assign ID...
· Layout width = match_parent ajuster la largeur de l'objet à celle du layout
· Layout height = wrap_content ajuster la hauteur de l'objet au contenu de l'objet
· Text size = 20dp taille des caractères
· Editable = false empêche la saisie dans la zone
· Cursor visible = false pas de curseur dans la zone
· Input type = text le type de donnée dans la zone
Remarque : Match_parent et fill_parent sont sensiblement similaires.
Première rangée de 4 boutons :
Dans la palette, ouvrez le groupe Layouts, choisissez l'objet LinearLayout (Horizontal) et placez le sous le TextView. Puis réglez ses propriétés :
· Orientation = horizontal
· Layout width = match_parent prendre tout l'espace disponible en largeur
· Layout height = wrap_content ajuster la hauteur du layout à son contenu
Dans la palette, ouvrez le groupe Form Widgets, choisissez l'objet Button et placez en 4 dans le layout créé à l'étape précédente. Puis réglez leurs propriétés :
· Id = @+id/button1 @+id/button2 @+id/button3 @+id/buttonAddition
· Text = "1" "2" "3" "+"
· Text size = "20dp"
· Layout width = match_parent
· Layout height = wrap_content
· Layout weight = "1"
![]() Pour les 3 autres rangées de boutons, vous pouvez rester dans
l'éditeur graphique et suivre les
Pour les 3 autres rangées de boutons, vous pouvez rester dans
l'éditeur graphique et suivre les
consignes suivantes, mais vous pouvez aussi passer en mode XML, et recopier 3 fois le code
correspondant au layout contenant les 4 premiers boutons.
Il faut alors modifier les propriétés Id et Text de chaque bouton.
Deuxième rangée de 4 boutons :
Dans la palette, ouvrez le groupe Layouts, choisissez l'objet LinearLayout (Horizontal) et placez le sous le TextView. Puis réglez ses propriétés :
· Orientation = horizontal
· Layout width = match_parent prendre tout l'espace disponible en largeur
· Layout height = wrap_content ajuster la hauteur du layout à son contenu
Dans la palette, ouvrez le groupe Form Widgets, choisissez l'objet Button et placez en 4 dans le layout créé à l'étape précédente. Puis réglez leurs propriétés :
· Id = @+id/button4 @+id/button5 @+id/button6 @+id/buttonSoustraction
· Text = "4" "5" "6" "-"
· Text size = "20dp"
· Layout width = match_parent
· Layout height = wrap_content
· Layout weight = "1"
Troisième rangée de 4 boutons :
Dans la palette, ouvrez le groupe Layouts, choisissez l'objet LinearLayout (Horizontal) et placez le sous le TextView. Puis réglez ses propriétés :
· Orientation = horizontal
· Layout width = match_parent prendre tout l'espace disponible en largeur
· Layout height = wrap_content ajuster la hauteur du layout à son contenu
Dans la palette, ouvrez le groupe Form Widgets, choisissez l'objet Button et placez en 4 dans le layout créé à l'étape précédente. Puis réglez leurs propriétés :
· Id = @+id/button7 @+id/button8 @+id/button9 @+id/buttonMultiplication
· Text = "7" "8" "9" "*"
· Text size = "20dp"
· Layout width = match_parent
· Layout height = wrap_content
· Layout weight = "1"
Quatrième rangée de 4 boutons :
Dans la palette, ouvrez le groupe Layouts, choisissez l'objet LinearLayout (Horizontal) et placez le sous le TextView. Puis réglez ses propriétés :
· Orientation = horizontal
· Layout width = match _parent prendre tout l'espace disponible en largeur
· Layout height = wrap_content ajuster la hauteur du layout à son contenu
Dans la palette, ouvrez le groupe Form Widgets, choisissez l'objet Button et placez en 4 dans le layout créé à l'étape précédente. Puis réglez leurs propriétés :
· Id = @+id/button0 @+id/buttonPoint @+id/buttonClear @+id/buttonDivision
· Text = "0" "." "C" "/"
· Text size = "20dp"
· Layout width = match _parent
· Layout height = wrap_content
· Layout weight = "1"
Le bouton Egal :
Dans la palette, ouvrez le groupe Form Widgets, choisissez l'objet Button et placez en 1 à la suite des 4 layouts créés aux étapes précédentes. Puis réglez ses propriétés :
· Id = @+id/buttonEgal
· Text = "="
· Text size = "20dp"
· Layout width = match _parent
· Layout height = wrap_content
On peut ensuite utiliser l'onglet main.xml pour vérifier le codage XML du fichier généré :
<?xml version="1.0" encoding="utf-8"?>
<LinearLayout xmlns:android="http://schemas.android.com/apk/res/android"
android:layout_width="match_parent"
android:layout_height="match_parent"
android:orientation="vertical" >
<EditText
android:id="@+id/editTextAffichage"
android:layout_width="match_parent"
android:layout_height="wrap_content"
android:editable="false"
android:textSize="20dp"
android:cursorVisible="false"
android:inputType="text">
<requestFocus />
</EditText>
<LinearLayout
android:layout_width="match_parent"
android:layout_height="wrap_content"
android:orientation="horizontal">
<Button
android:id="@+id/button1"
android:text="1"
android:textSize="20dp"
android:layout_width="match_parent"
android:layout_height="wrap_content"
android:layout_weight="1"/>
<Button
android:id="@+id/button2"
android:text="2"
android:textSize="20dp"
android:layout_width="match_parent"
android:layout_height="wrap_content"
android:layout_weight="1"/>
<Button
android:id="@+id/button3"
android:text="3"
android:textSize="20dp"
android:layout_width="match_parent"
android:layout_height="wrap_content"
android:layout_weight="1"/>
<Button
android:id="@+id/buttonAddition"
android:text="+"
android:textSize="20dp"
android:layout_width="match_parent"
android:layout_height="wrap_content"
android:layout_weight="1"/>
</LinearLayout>
<LinearLayout
android:layout_width="match_parent"
android:layout_height="wrap_content"
android:orientation="horizontal">
<Button
android:id="@+id/button4"
android:text="4"
android:textSize="20dp"
android:layout_width="match_parent"
android:layout_height="wrap_content"
android:layout_weight="1"/>
<Button
android:id="@+id/button5"
android:text="5"
android:textSize="20dp"
android:layout_width="match_parent"
android:layout_height="wrap_content"
android:layout_weight="1"/>
<Button
android:id="@+id/button6"
android:text="6"
android:textSize="20dp"
android:layout_width="match_parent"
android:layout_height="wrap_content"
android:layout_weight="1"/>
<Button
android:id="@+id/buttonSoustraction"
android:text="-"
android:textSize="20dp"
android:layout_width="match_parent"
android:layout_height="wrap_content"
android:layout_weight="1"/>
</LinearLayout>
<LinearLayout
android:layout_width="match_parent"
android:layout_height="wrap_content"
android:orientation="horizontal">
<Button
android:id="@+id/button7"
android:text="7"
android:textSize="20dp"
android:layout_width="match_parent"
android:layout_height="wrap_content"
android:layout_weight="1"/>
<Button
android:id="@+id/button8"
android:text="8"
android:textSize="20dp"
android:layout_width="match_parent"
android:layout_height="wrap_content"
android:layout_weight="1"/>
<Button
android:id="@+id/button9"
android:text="9"
android:textSize="20dp"
android:layout_width="match_parent"
android:layout_height="wrap_content"
android:layout_weight="1"/>
<Button
android:id="@+id/buttonMultiplication"
android:text="*"
android:textSize="20dp"
android:layout_width="match_parent"
android:layout_height="wrap_content"
android:layout_weight="1"/>
</LinearLayout>
<LinearLayout
android:layout_width="match_parent"
android:layout_height="wrap_content"
android:orientation="horizontal">
<Button
android:id="@+id/button0"
android:text="0"
android:textSize="20dp"
android:layout_width="match_parent"
android:layout_height="wrap_content"
android:layout_weight="1"/>
<Button
android:id="@+id/buttonPoint"
android:text="."
android:textSize="20dp"
android:layout_width="match_parent"
android:layout_height="wrap_content"
android:layout_weight="1"/>
<Button
android:id="@+id/buttonClear"
android:text="C"
android:textSize="20dp"
android:layout_width="match_parent"
android:layout_height="wrap_content"
android:layout_weight="1"/>
<Button
android:id="@+id/buttonDivision"
android:text="/"
android:textSize="20dp"
android:layout_width="match_parent"
android:layout_height="wrap_content"
android:layout_weight="1"/>
</LinearLayout>
<Button
android:id="@+id/buttonEgal"
android:textSize="20dp"
android:layout_width="match_parent"
android:layout_height="wrap_content"
android:text="="/>
</LinearLayout>
Lancez l'exécution de l'application dans l'AVD, suivre le déroulement, et quand l'application est prête, essayez-la :
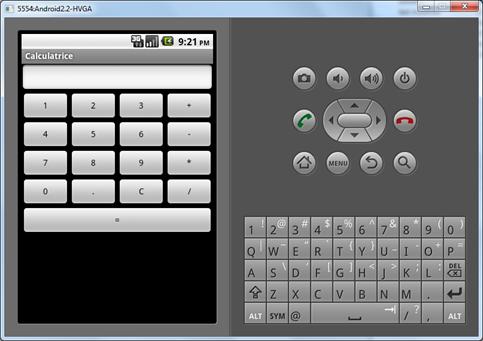
Pour l'instant, il ne se passe rien quand on clique sur les boutons ; il faut ajouter de la programmation.
![]() Pour continuer le développement de l'application, n'arrêtez pas
l'AVD
Pour continuer le développement de l'application, n'arrêtez pas
l'AVD
et revenez à la perspective Java.
6- Programmation Java
La phase suivante consiste à programmer dans le fichier AndroidCalculatriceActivity.java :
package com.android.calculatrice;
import android.app.Activity;
import android.os.Bundle;
import android.view.View;
import android.widget.Button;
import android.widget.EditText;
public classAndroidCalculatriceActivity extendsActivity {
//On déclare toutes les variables dont on aura besoin
Button button0, button1, button2, button3, button4, button5, button6, button7, button8, button9;
Button buttonAddition, buttonSoustraction, buttonDivision, buttonMultiplication;
Button buttonClear, buttonEgal, buttonPoint;
EditText ecran;
private double nombre1, nombre2;
private boolean calculPossible = false; // devient true au premier clic sur un opérateur
private boolean premierChiffreSaisi = false;
private String operateur= "";
/** Fonction appelée lors de la création de l'activité. */
@Override
public void onCreate(Bundle savedInstanceState) {
super.onCreate(savedInstanceState);
setContentView(R.layout.main);
initialisations();
}
/** Fonction appelée par l'événement onCrate. */
public void initialisations() {
//On récupère tout les éléments de notre interface graphique grâce aux ID
button0 = (Button) findViewById(R.id.button0);
button1 = (Button) findViewById(R.id.button1);
button2 = (Button) findViewById(R.id.button2);
button3 = (Button) findViewById(R.id.button3);
button4 = (Button) findViewById(R.id.button4);
button5 = (Button) findViewById(R.id.button5);
button6 = (Button) findViewById(R.id.button6);
button7 = (Button) findViewById(R.id.button7);
button8 = (Button) findViewById(R.id.button8);
button9 = (Button) findViewById(R.id.button9);
buttonPoint = (Button) findViewById(R.id.buttonPoint);
buttonAddition = (Button) findViewById(R.id.buttonAddition);
buttonSoustraction = (Button) findViewById(R.id.buttonSoustraction);
buttonDivision = (Button) findViewById(R.id.buttonDivision);
buttonMultiplication = (Button) findViewById(R.id.buttonMultiplication);
buttonClear = (Button) findViewById(R.id.buttonClear);
buttonEgal = (Button) findViewById(R.id.buttonEgal);
ecran = (EditText) findViewById(R.id.editTextAffichage);
//On attribut un écouteur d'évènement à tout les boutons
buttonAddition.setOnClickListener(new View.OnClickListener() {
public void onClick(View v) {
operateurClick("+");
}
});
buttonSoustraction.setOnClickListener(new View.OnClickListener() {
public void onClick(View v) {
operateurClick("-");
}
});
buttonDivision.setOnClickListener(new View.OnClickListener() {
public void onClick(View v) {
operateurClick("/");
}
});
buttonMultiplication.setOnClickListener(new View.OnClickListener() {
public void onClick(View v) {
operateurClick("*");
}
});
buttonClear.setOnClickListener(new View.OnClickListener() {
public void onClick(View v) {
resetClick();
}
});
buttonEgal.setOnClickListener(new View.OnClickListener() {
public void onClick(View v) {
egalClick();
}
});
buttonPoint.setOnClickListener(new View.OnClickListener() {
public void onClick(View v) {
chiffreClick(".");
}
});
button0.setOnClickListener(new View.OnClickListener() {
public void onClick(View v) {
chiffreClick("0");
}
});
button1.setOnClickListener(new View.OnClickListener() {
public void onClick(View v) {
chiffreClick("1");
}
});
button2.setOnClickListener(new View.OnClickListener() {
public void onClick(View v) {
chiffreClick("2");
}
});
button3.setOnClickListener(new View.OnClickListener() {
public void onClick(View v) {
chiffreClick("3");
}
});
button4.setOnClickListener(new View.OnClickListener() {
public void onClick(View v) {
chiffreClick("4");
}
});
button5.setOnClickListener(new View.OnClickListener() {
public void onClick(View v) {
chiffreClick("5");
}
});
button6.setOnClickListener(new View.OnClickListener() {
public void onClick(View v) {
chiffreClick("6");
}
});
button7.setOnClickListener(new View.OnClickListener() {
public void onClick(View v) {
chiffreClick("7");
}
});
button8.setOnClickListener(new View.OnClickListener() {
public void onClick(View v) {
chiffreClick("8");
}
});
button9.setOnClickListener(new View.OnClickListener() {
public void onClick(View v) {
chiffreClick("9");
}
});
} // fin de la fonction Initialisations
//voici la méthode qui est exécutée lorsque l'on clique sur un bouton chiffre
public void chiffreClick(String unCaractere) {
String lesCaracteresAffiches = "";
if(premierChiffreSaisi == false|| ecran.getText ().equals ("0")){
premierChiffreSaisi = true;
lesCaracteresAffiches = unCaractere;
}else{
lesCaracteresAffiches = ecran.getText() + unCaractere;
}
ecran.setText(lesCaracteresAffiches);
}
//voici la méthode qui est exécutée lorsque l'on clique sur un des 4 opérateurs
public void operateurClick(String unOperateur){
if(calculPossible){
calcul();
ecran.setText(String.valueOf(nombre1));
}else{
nombre1 = Double.valueOf(ecran.getText().toString()).doubleValue();
calculPossible = true;
}
operateur = unOperateur;
premierChiffreSaisi = false;
}
//voici la méthode qui est exécutée lorsque l'on clique sur le bouton =
public void egalClick(){
calcul();
premierChiffreSaisi = false;
calculPossible = false;
}
//voici la méthode qui est exécutée lorsque l'on clique sur le bouton C (Clear)
public void resetClick(){
calculPossible = false;
premierChiffreSaisi = false;
nombre1 = 0;
operateur = "";
ecran.setText("");
}
//Voici la méthode qui fait le calcul qui a été demandé par l'utilisateur
private void calcul(){
nombre2 = Double.valueOf(ecran.getText().toString());
if(operateur.equals("+")){
nombre1 = nombre1 + nombre2;
ecran.setText(String.valueOf(nombre1));
}
if(operateur.equals("-")){
nombre1 = nombre1 - nombre2;
ecran.setText(String.valueOf(nombre1));
}
if(operateur.equals("*")){
nombre1 = nombre1 * nombre2;
ecran.setText(String.valueOf(nombre1));
}
if(operateur.equals("/")){
try{
nombre1 = nombre1 / nombre2;
ecran.setText(String.valueOf(nombre1));
}catch(ArithmeticException e){
ecran.setText("0");
}
}
}
}
Lancez l'exécution de l'application dans l'AVD, passer en perspective DDMS pour suivre le déroulement, et quand l'application est prête, testez différentes opérations.
7- Améliorations à réaliser (liste non exhaustive…)
· Modifier l'icône de l'application (chercher la méthode sur Internet)
· Empêcher de taper un deuxième point décimal dans un nombre.
· Ne pas effectuer de calcul quand on clique une nouvelle fois sur le bouton = sans avoir tapé de nouvelle valeur (essayez de taper la séquence 3 + 4 = = = pour constater le problème).
· Ne pas effectuer de calcul quand on clique sur le bouton = sans avoir saisi un nombre, ou après avoir cliqué sur le bouton Clear.
· Empêcher de commencer la saisie par un opérateur * ou / ; on peut par contre commencer la saisie avec un + ou un – pour préciser le signe de la valeur. Dans ce cas, il faut traiter le + et le – comme des chiffres et non pas comme des opérateurs.