Personnaliser une ListView dans une application Android
Les ListView sont très utiles pour afficher clairement un grand nombre de données. Néanmoins insérer une simple ListView dans son application Android peut ne pas convenir esthétiquement parlant. Nous allons donc voire comment personnaliser une ListView.
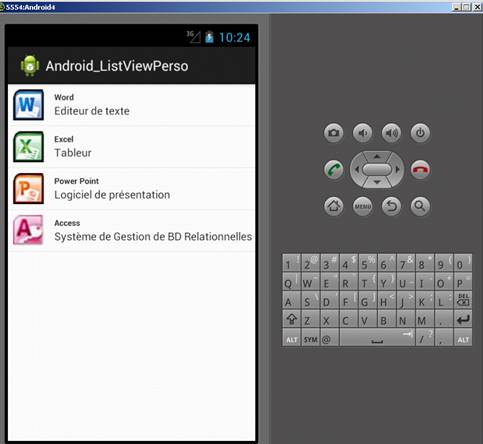
Voici le résultat espéré :
Il faut, tout d'abord, récupérer les 4 icônes Microsoft Office afin de personnaliser la ListView comme ci-dessus puis les importer dans le dossier "res/drawable" (à créer si nécessaire)
Code XML
Insertion de la ListView dans l'activity principal.
<?xml version="1.0" encoding="utf-8"?> <LinearLayout xmlns:android="http://schemas.android.com/apk/res/android" android:orientation="vertical" android:layout_width="fill_parent" android:layout_height="fill_parent" >
<ListView
android:id="@+id/listviewperso" android:layout_width="fill_parent" android:layout_height="fill_parent" />
</LinearLayout>
|
Création d'un nouveau fichier XML "affichageitem.xml", qui va permettre de créer la vue qui affichera l’item dans la ListView. Schéma montrant la structure de la vue affichageitem:

Voici le fichier affichageitem.xml correspondant à ce schéma.
|
<?xml version="1.0" encoding="utf-8"?> <LinearLayout xmlns:android="http://schemas.android.com/apk/res/android" android:orientation="horizontal" android:layout_width="fill_parent" android:layout_height="wrap_content" >
<ImageView android:id="@+id/img" android:layout_width="wrap_content" android:layout_height="wrap_content" android:layout_gravity="center_vertical" android:padding="10px" />
<LinearLayout android:orientation="vertical" android:layout_width="fill_parent" android:layout_height="wrap_content" android:layout_gravity="center_vertical" android:paddingLeft="10px" android:layout_weight="1" >
<TextView android:id="@+id/titre" android:layout_width="fill_parent" android:layout_height="fill_parent" android:textSize="16px" android:textStyle="bold" />
<TextView android:id="@+id/description" android:layout_width="fill_parent" android:layout_height="fill_parent" />
</LinearLayout>
</LinearLayout> |
Code JAVA
Outre la personnalisation d'un ListView ce code permet d'appréhender l'utilisation d'un SimpleAdapter et d'une AlertDialog :
|
package com.example.android_listviewperso;
import java.util.ArrayList; import java.util.HashMap;
import com.example.android_listviewperso.R;
import android.app.Activity; import android.app.AlertDialog; import android.os.Bundle; import android.view.View; import android.widget.AdapterView; import android.widget.ListView; import android.widget.SimpleAdapter; import android.widget.AdapterView.OnItemClickListener;
public class ActivitePrincipal extends Activity { private ListView maListViewPerso;
/** Called when the activity is first created. */ @Override public void onCreate(Bundle savedInstanceState) { super.onCreate(savedInstanceState); setContentView(R.layout.activity_activite_principal);
//Récupération de la listview créée dans le fichier main.xml maListViewPerso = (ListView) findViewById(R.id.listviewperso);
//Création du ArrayList qui nous permettra de remplir le listView ArrayList<HashMap<String, String>> listItem = new ArrayList<HashMap<String, String>>();
//On déclare la HashMap qui contiendra les informations pour un item HashMap<String, String> map;
//Création d'une HashMap pour insérer les informations du premier item de notre listView map = new HashMap<String, String>(); //on insère un élément titre que l'on récupérera dans le textView titre créé dans le fichier affichageitem.xml map.put("titre", "Word"); //on insère un élément description que l'on récupérera dans le textView description créé dans le fichier affichageitem.xml map.put("description", "Editeur de texte"); //on insère la référence à l'image (en String car normalement c'est un int) que l'on récupérera dans l'imageView créé dans le fichier affichageitem.xml map.put("img", String.valueOf(R.drawable.icone_word)); //enfin on ajoute cette hashMap dans la arrayList listItem.add(map);
//On refait la manip plusieurs fois avec des données différentes pour former les items de notre ListView
map = new HashMap<String, String>(); map.put("titre", "Excel"); map.put("description", "Tableur"); map.put("img", String.valueOf(R.drawable.icone_excel)); listItem.add(map);
map = new HashMap<String, String>(); map.put("titre", "Power Point"); map.put("description", "Logiciel de présentation"); map.put("img", String.valueOf(R.drawable.icone_powerpoint)); listItem.add(map);
map = new HashMap<String, String>(); map.put("titre", "Access"); map.put("description", "Système de Gestion de BD Relationnelles"); map.put("img", String.valueOf(R.drawable.icone_access)); listItem.add(map);
//Création d'un SimpleAdapter qui se chargera de mettre les items présent dans notre list (listItem) dans la vue affichageitem SimpleAdapter mSchedule = new SimpleAdapter (this.getBaseContext(), listItem, R.layout.affichageitem, new String[] {"img", "titre", "description"}, new int[] {R.id.img, R.id.titre, R.id.description});
//On attribue à notre listView l'adapter que l'on vient de créer maListViewPerso.setAdapter(mSchedule);
//Enfin on met un écouteur d'évènement sur notre listView maListViewPerso.setOnItemClickListener(new OnItemClickListener() { @Override @SuppressWarnings("unchecked") public void onItemClick(AdapterView<?> a, View v, int position, long id) { //on récupère la HashMap contenant les infos de notre item (titre, description, img) HashMap<String, String> map = (HashMap<String, String>) maListViewPerso.getItemAtPosition(position); //on créer une boite de dialogue AlertDialog.Builder adb = new AlertDialog.Builder(ActivitePrincipal.this); //on attribue un titre à notre boite de dialogue adb.setTitle("Sélection Item"); //on insère un message à notre boite de dialogue, et ici on affiche le titre de l'item cliqué adb.setMessage("Votre choix : "+map.get("titre")); //on indique que l'on veut le bouton ok à notre boite de dialogue adb.setPositiveButton("Ok", null); //on affiche la boite de dialogue adb.show(); } }); }
}
|